Getting started with Experiences
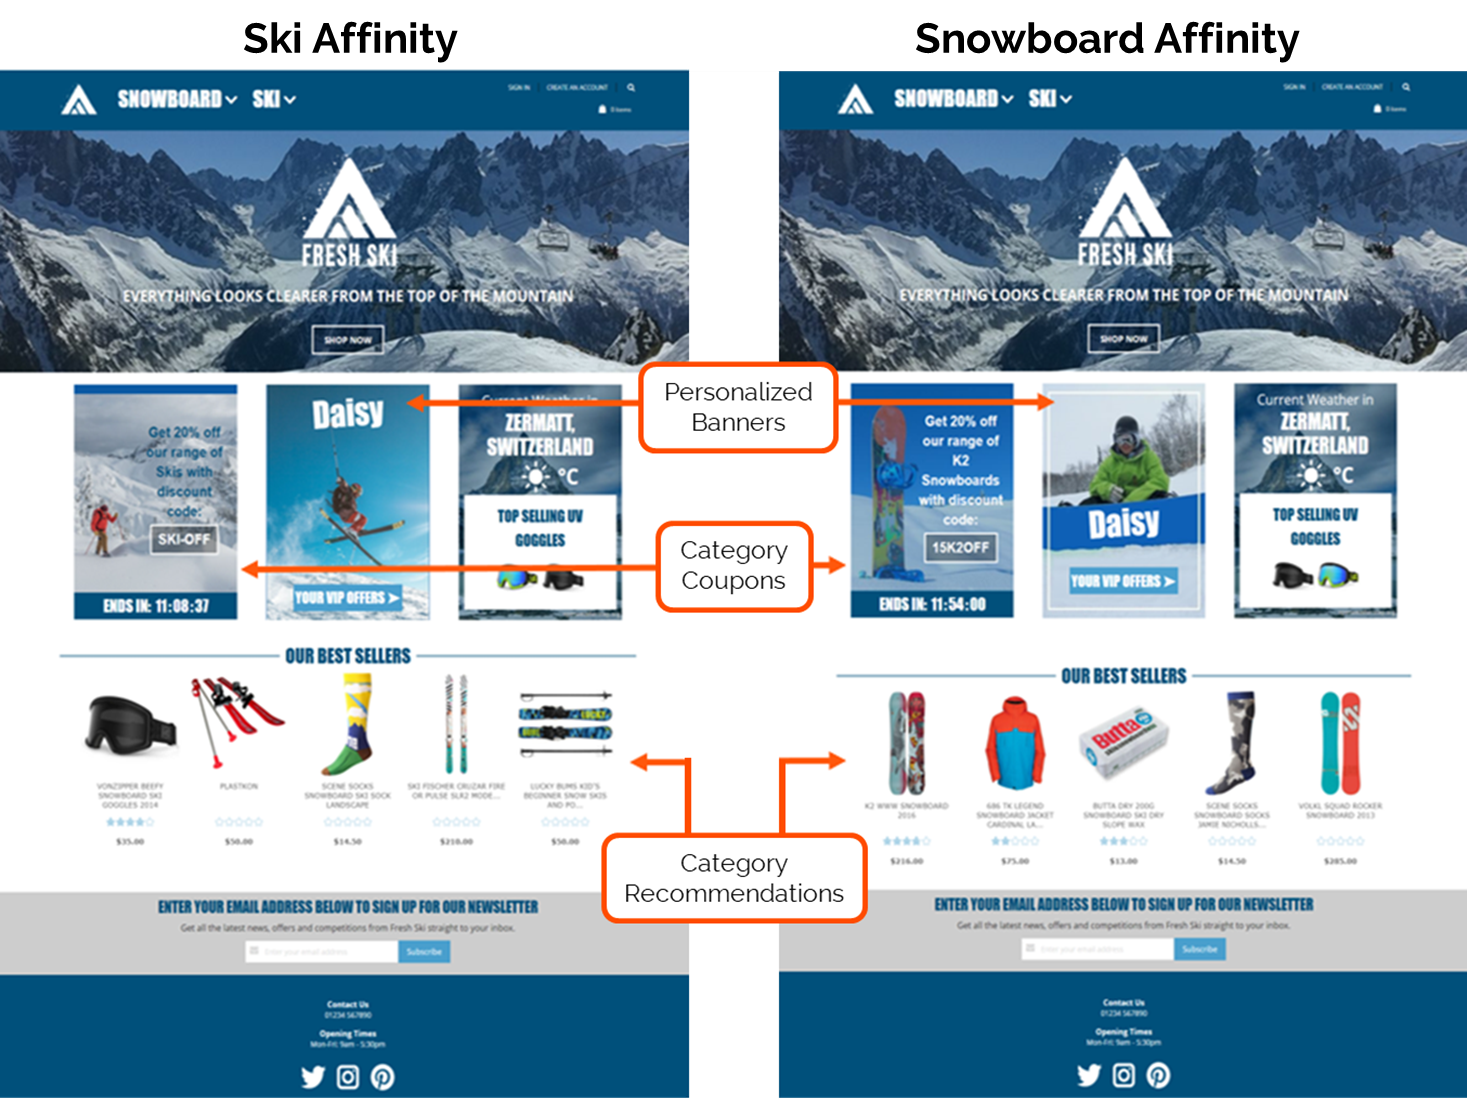
Fresh Relevance Experience Management allows you to group pieces of content across touchpoints and channels to create a consistent, personalized marketing campaign.
Experiences allow you to create 1 set of rules to allocate a visitor to an Experience, and assign various content across both Web and Email touchpoints to that experience. Without Experiences, you would need to set these rules for each piece of content separately – which can be quite intensive if you vary content by many and/or complex Rules.
Before we get started, there are some core ideas worth knowing:
- Each Experience has a dedicated Site Editor. This allows you to change your website look and feel as well as the content.
- Visitors are allocated to Experiences in a similar way that you’ve previously assigned content based on Fresh Relevance’s Trigger and Slot Marketing Rules

How to get started
Step 1 – Map out Customer Segments
- There are 2 main questions to ask:
Who/when would you like visitors to see different content?
This could be based on any of our Marketing Rules, including imported data from your other platforms. Here are some ideas to get you started:
- Customer type e.g. new vs. returning customers, regular vs. VIP customers
- Customer prefereces e.g. category or brand affinity, previous purchase, recency of purchase
- Stage of purchase funnel e.g. browsed or carted products, number of recent sessions
- Time based content e.g. Black Friday sales, store hours
Next is to ask yourself: How should the content differ for these groups of customers
All Fresh content can be assigned to an Experinece, here are some starting ideas:
- Exclusive Offers e.g. for new customers or those with high website return rates
- Category affinity Banners
- Newsletter signup forms for new customers
- Dynamic countdown timers for early sales access for VIP customers
- Category preference driven recommendations
Step 2 – Create content
- Create your SmartBlock Content and/or Triggered Campaigns, with a version per Experience where applicable.
Top Tip:
Create your first piece of content, then duplicate and tweak to be relevant to each Experience
Step 3 – Create your Experiences
- On the left hand Nav, go to Content | Experiences
- Click Create Experience
- Name and Save your Experience
Step 4a – Assign Content via Site Editor
-
When using Experiences, Fresh Relevance will create a Site Editor for each Experience. This also allows you to deploy content in different locations for each Experience.
- On the Left hand Nav, Click Content | Site Editor
- At the top drop down, Select the Site Editor for your Experience
- Drag and Drop your content into your website
Step 4b – Assign Content via Slot Marketing Rules
Content can also be added to an experience via Slot Marketing Rules
- In the left Nav, Click Content | Slots
- In the top tabs select your Email, Website or Trigger Slots
- Select the Slot you’d like to assign to an Experience
- Navigate to the Rules
- Drag the Person | On Experience Rule into your Rule tree
- Click on the Rule and select your Experience
- Click Add SmartBlocks and drag the SmartBlock you’d like to show to that Experience into the Yes path of the Tree
- Save your Slot
Step 5 – Test your Content
Preview your Web Content by previewing your website in the Site Editor:
- On the left Nav, got to Content | Site Editor
- Click Preview to open your website in a new tab with a content preview
- Use the Site Info Bar Experience drop down to preview what your website will look like when assigned to different Experiences. You can also select multiple Experineces to see how they interact
To test your email content you will need to issue the email to a test address which matches each Experience’s criteria. e.g. to test a new customer Experience, create a new email address and follow your signup process.
Step 6 – Launch Experience via Experience Rules
Exprerience Marketing Rules work the same as other parts of the Fresh Relevance platform, except that you can have multiple sets of Rules to allocate customers to multiple Experiences. For more simple designs, you may only need 1 set of Experience Rules.
When migrating to Experiences, a default Rule set is created
- On the left hand Nav go to Content | Experiences
- Click on Manage Experience Rules
- Either click on an existing rule set or click Create Rule Set to create and name a new set
- This will land you on the Experiences Rule Tree
- Add Rules using the Drag and Drop interface to identify visitors to be placed on your experience.
- Click Add Experience and Drag your chosen experience into the Yes path of your Rule Tree
- Save your rules
If creating a new Rule set, you will also need to turn this on by returning to the Experience Rules page, and clicking on the Toggle under Status
